Setup NUT Server on Synolgoy Setup Router and XCP-NG
Synology Setup
Synology DSM has already built in UPS support.
In DSM using an administrative account open Control Panel – Hardware & Power – UPS.
In the configuration you have the choice between “Synology UPS server” and “SNMP UPS”.
The bad news is, that “SNMP UPS” are mostly very expensive. Professional UPS devices from APC have a so called “smart slot” where a proprietary optional network card from APC can be installed. While these are available for the higher-priced devices, the cards alone sometimes cost more then the UPS device itself.
The good news is, “Synology UPS server” is nothing else then a hidden installation of Network UPS Tools (NUT). The same software we already use in our other devices, like server and Uninterruptible Power Supply.
This makes it easy to use “Synology UPS server” with non-Synology masters. The only thing to keep in mind, is that Synology uses a hard-coded values for UPS device name, the user and the password. This makes it easy for all Synology devices to connect to each other. The user just needs to provide the IP address.
The values are:
| UPS device name | ups |
| slave user name | monuser |
| slave password | secret |
On the NAS these are found in the file /usr/syno/etc/ups/upsmon.conf.
So any NUT master server can be used as “Synology UPS server”, as long as its UPS device is called “ups” and a slave user “monuser” with the matching password is present.
On the master this is set up in the /etc/nut/ups.conf by adding a section explicatively called [ups] as follows:
[ups]
driver = usbhid-ups
port = auto
“Driver” and “port” values may vary according to your UPS device.
And in the file /usr/syno/etc/ups/upsd.users:
[monuser]
password = secret
upsmon = slave
OpenSense/PFsense Setup
Installing NUT
If you are using pfSense, you can install nut from the Package Manager. Once installed you will be able to access the setup from Services > UPS.
Select “Remote snmp” from the UPS Type, provide the UPS Name as ups, and set the Remote IP address to the IP or hostname of the UPS.
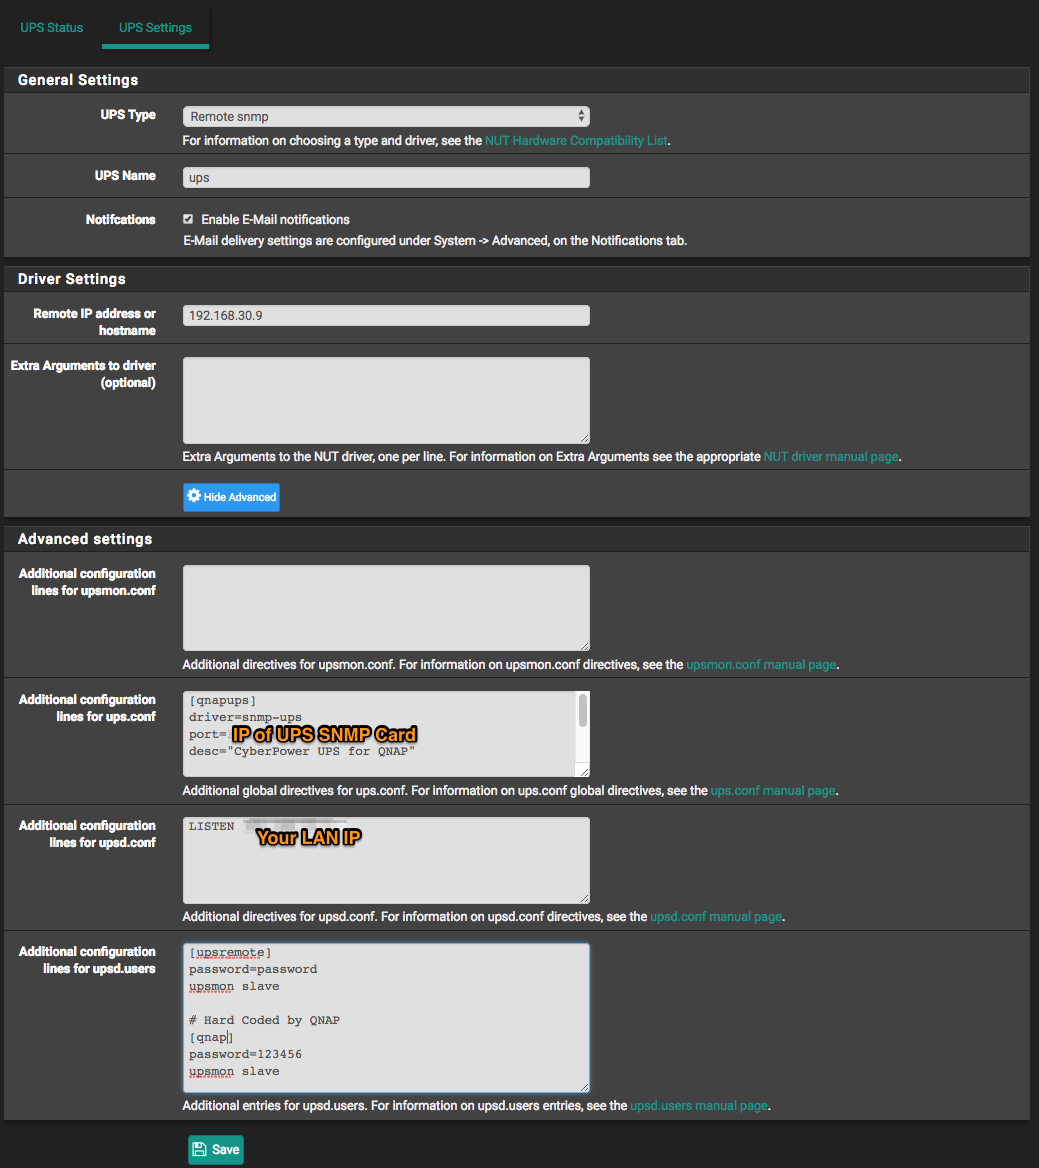
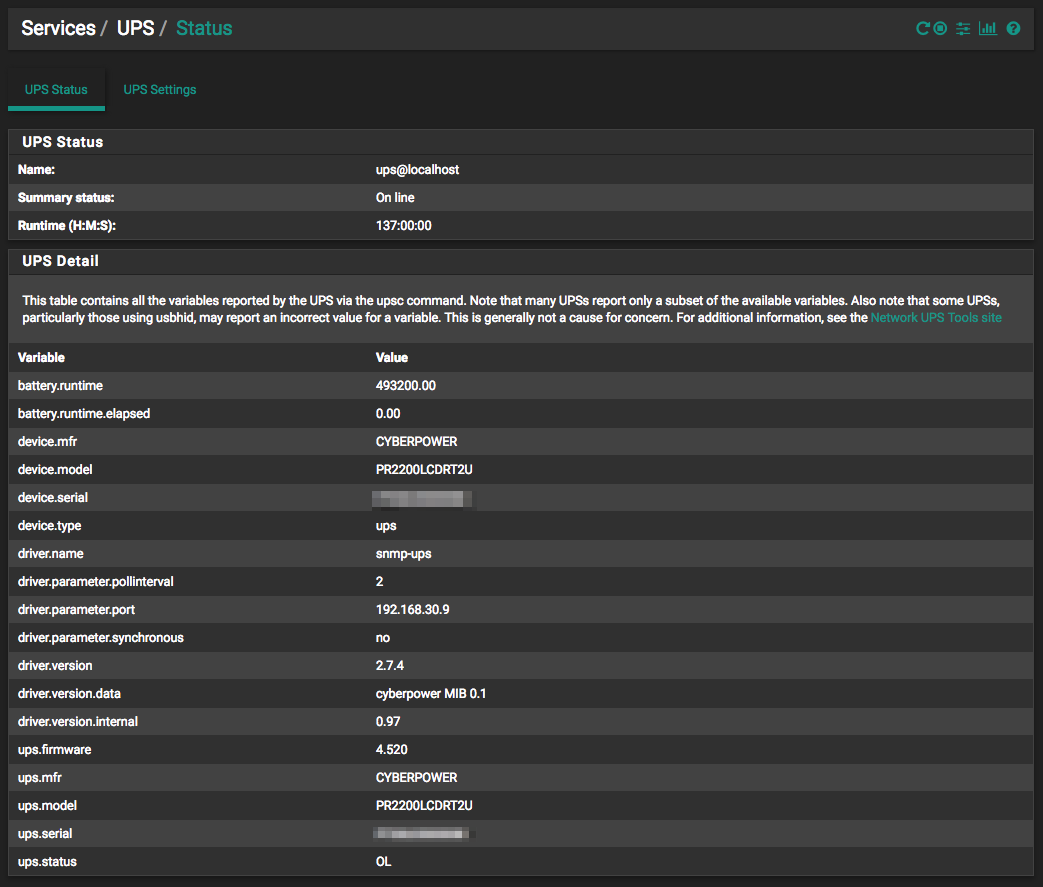
After clicking save, you should be able to see the status on the UPS Status page.
That wasn’t too hard was it? Okay so now that we have NUT talking to the UPS, we need to tell NUT how to behave, and to configure nut clients to listen to the NUT server.
OPNsense
OPNsense comes with the NUT client under it’s Services menu.
Under “UPS Type” use netclient and enable input user/pass/ip

XenServer goes NUTS
Confirmed method works on 8.0
For our test we are using the current XenServer 7.4 (Actually we are using XCP-ng 7.4). We need to install the NUT Client and configure it to talk to the NUT Server running on our pfSense.
We will be installing software in the Dom0. If you are uncomfortable doing this, You may want to modify this setup to run as a dedicated VM. Perhaps using Alpine Linux would be a really good option and not require much resources, or consider deploying a dedicated appliance such as a Raspberry Pi, which I hope to cover in the future.
By default the built in repository does not have the required library, so we need to enable the epel repository before we can install the nut-client
yum --enablerepo=* install epel-release

yum --enablerepo=* install nut-client.x86_64
Now we need to tell NUT that we want it to listen to an existing NUT Server, in other words, we want to be a “client”.
nano /etc/ups/nut.conf
MODE=netclient
Now that NUT knows it will be retrieving information from another network server, we need to tell it what network server to “MONITOR”. You will need to modify only 2 variables in the file /etc/ups/upsmon.conf but take a look around because you can tweak how the NUT Client responds by modifying the settings in this file. For now, lets just tell NUT where to retrieve its information from.
nano /etc/ups/upsmon.conf
MONITOR ups@192.168.1.2 1 upsremote password slave
SHUTDOWNCMD "/etc/ups/xen-shutdown.sh"
You probably already have a SHUTDOWNCMD in your configuration Just add a comment “#” to the start of the line and add the one provided above. Speaking of the SHUTDOWNCMD, you will notice that we are calling a specific script. This script can be downloaded here.
cd /etc/ups
wget https://raw.githubusercontent.com/serrc-techops/NUT-Configuration/master/slave/xen/xen-shutdown.sh
chmod +x xen-shutdown.sh
This script will loop through all of the VM’s running on our server and shut them down. This does require that you have XenTools installed in your guests, so if you have not done that, go do it, you will have better VM performance as well! You may want to consider modifying the script to fit your needs, such as perhaps pausing the state of the machine rather then shutting it down.
So on a power failure, the NUT Master sends a message to all subscribed NUT Clients, and the NUT Client shuts down based on its configuration. Wonderful Now our Xen Guests can shutdown, and so can our server. But what happens when we power them back up? We need to make sure that NUT starts on our XenServer.
To do so create a new file, /etc/systemd/system/nut-monitor.service and add the following to it.
[Unit]
Description=Network UPS Tools - XenServer Shutdown
After=local-fs.target network.target

[Service]
ExecStart=/usr/sbin/upsmon
PIDFile=/run/nut/upsmon.pid
Type=forking

[Install]
WantedBy=multi-user.target
Now that we have a system startup script in place, lets make sure it runs on start up.
systemctl enable nut-monitor.service
systemctl daemon-reload
systemctl start nut-monitor
You can verify that it started up with out issues by entering systemctl status nut-monitor
Testing Shutdown
There are 2 things we need to test. First test the xen-shutdown.sh script from your XenServer. It should shutdown all guests and then shut down the XenServer host. Once the XenServer host is shutdown you will need to manually power it up, use WoL, if it has been enabled, or use IPMI, iLO, Drac to remotely start the system again.
If the system shut down correctly, and you have powered it back up, you will want to test that NUT is actually working for you. Do this by logging in to the console of your pfSense, or NUT server, and issuing the command:
upsmon -c fsd
That should shut everything down, including your pfSense or NUT Server. So make sure you have a way of powering it back up.
Conclusion
NUT allows you to monitor UPS devices, including network attached devices with SNMP management cards. Allowing you to have clients that can retrieve the results from the server and execute actions or scripts based on the UPS Status. We just scratched the surface, next time we will configure a QNap to monitor the status and shut down as needed. You can also setup a NUT Mater to work with multiple UPS units. Installing NUT at the Host level allows you to “forget” to install client tools per VM, and assure all your critical systems shut down safely.
Test Connection to NUTS server
upsc ups@192.168.x.x
or just upsc from cli
Research:
https://forums.lawrencesystems.com/t/ups-to-send-shutdown-signal-to-xcp-ng-freenas/2659
https://hackernoon.com/how-to-shutdown-your-servers-in-case-of-power-failure-ups-nut-co-34d22a08e92
https://roll.urown.net/NAS/nas-ups.html
https://calvin.me/network-ups-tools/